This is an old revision of the document!
Documentation for Google Backup and Sync
This guide will cover a few different topics about Google Backup and Sync. You can skip to the section you want by clicking on the links below.
First Time Setup
How to Check if Backup and Sync is Already Running
Before you attempt first time setup, look for the icon as shown below in the upper right hand corner of your screen. If you see it, that means Backup and Sync is already running and you can skip down to If Backup and Sync is Already Installed.
If the cloud icon has the arrow inside of it as pictured, that means the sync is complete and the laptop is all backed up. If there is a circle spinning inside of the cloud that means the sync is ongoing.
Launching Backup and Sync
Google Backup and Sync is pre-installed on your district laptop. If it is not you can install it via Self Service.
For information about installing software on your district Macintosh computer please reference: Using Self Service
Once Backup and Sync is installed you can launch it from your Applications folder, Dock, or by searching for it using Spotlight(the little magnifying glass icon in the top right of your screen). If you are having trouble finding and launching Backup and Sync, please look here. Look for the icon below.
Configuring Backup and Sync
On the first page click “GET STARTED”
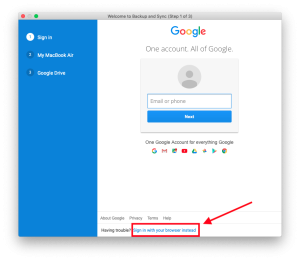
You will then be asked to sign in. Because you should already be signed into Chrome, the easiest way to do this in to click on “Sign in with your browser instead” on the bottom. This will open a web page. Click on your district email address. Then click “Allow”. You are now signed into Backup and Sync.
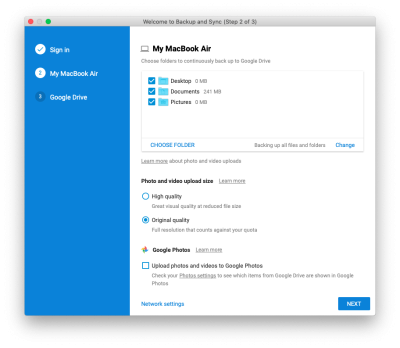
You will now need to select which folders you would like to sync with your Google Drive.
Click “GOT IT” then check off which folders you want to sync. If there is a specific folder you want to sync that you don't see you can click the “CHOOSE FOLDER” link and navigate to that folder.
Once you have selected all your folders click “NEXT”
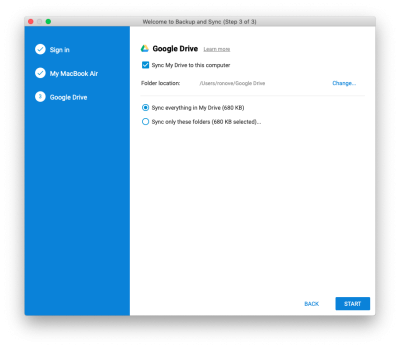
Next you need to decide if you want files that are already in your Google Drive to sync to a “Google Drive” folder on your computer. If you are unsure if you have enough free space, uncheck “Sync My Drive to this computer”. You can always access these files through the website.
Click “GOT IT” then choose what you would like to do. Keep in mind that there is a limited amount of storage on your local computer but unlimited storage on your Google Drive, so you may have more in your Google Drive than can fit on your computer. If you are unsure whether you have enough room uncheck the box (although Google will not let you sync more data than your computer can hold). However, it will completely fill your laptop's hard drive so heed any warnings that you may receive.
If Backup and Sync is Already Installed
Getting to the Preferences
To change the settings when Google Backup and sync is running, click the cloud icon in the upper righthand corner of your screen.
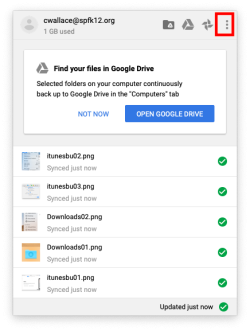
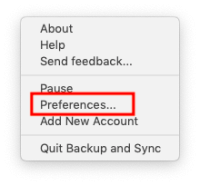
Next click on the three dots along the top of the Backup and Sync menu. Then in the pop out menu select Preferences.
Changing your Sync Preferences
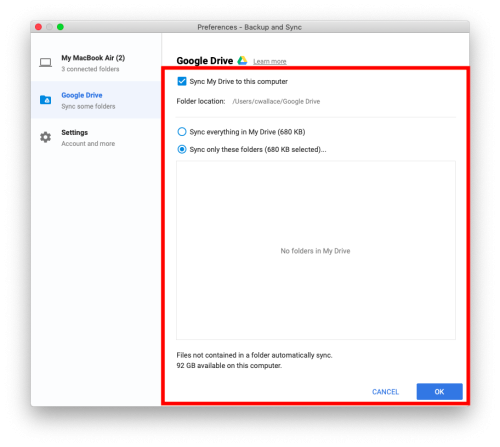
In the window that opens select Google Drive in the lefthand portion. This will bring you to a pane where you can select whether or not you want to sync files from Google Drive to your computer. You will also see the option to Sync only these folders, where you can selectively sync folders with Google Drive. Any folders that are checked will be downloaded to the computer(synced). If the box is not checked they are not being downloaded.
Deleting Non-Syncing Files to Clear Space
Once you've chosen which files you would like to sync, open Finder and click on Go>Home in the top bar. Click on the Google Drive folder and delete anything that you chose not to sync in the future. If the folders are NOT syncing they will remain in Google Drive on the web.
If you stopped the sync by unchecking the “Sync My Drive to the computer” box, you can safely delete the entire Google Drive folder and those files will remain in the web browser.
Troubleshooting
Storage Full
If Backup and Sync gives an error about the laptop storage being full, you will probably need to change the sync settings. It would probably be a good idea to uncheck the “Sync My Drive to this computer” check box and then follow the instructions to delete files that are no longer being synced. You can find further instructions for managing storage here.
Backup and Sync is Out of Date
If your version of Google Backup and Sync is out of date, you will need to install the newest version from Self Service. For more information on how to install applications from Self Service check out our wiki page here.
After you have reinstalled Backup and Sync, give your computer a restart to finish the process.
If you have issues that are not covered by the documentation please visit the Helpdesk.

